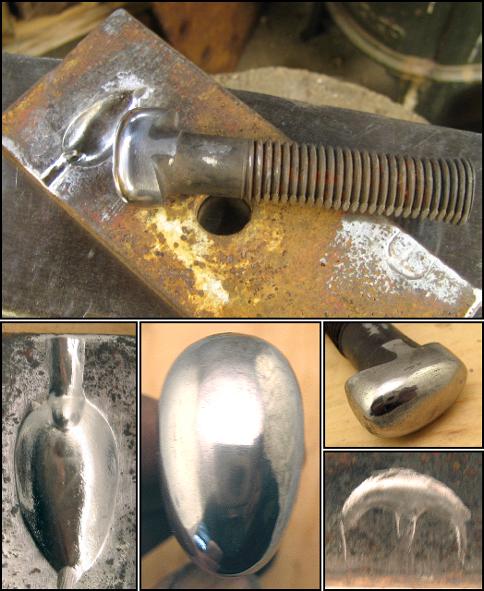
 Components of the spoon die
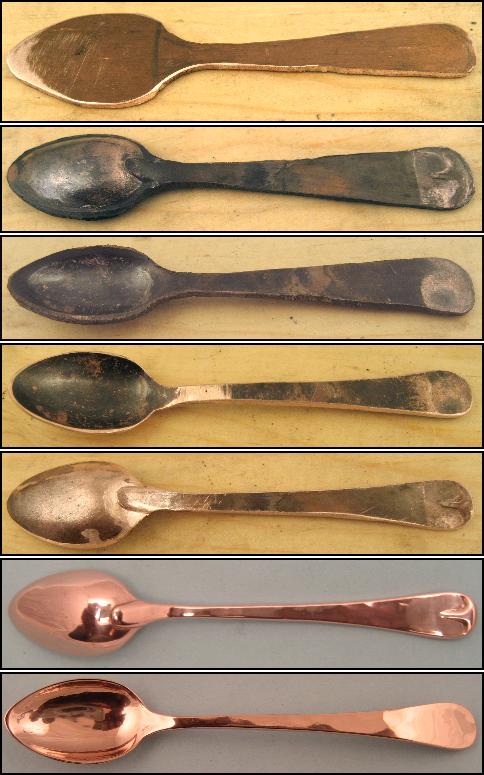 The stages - spoon blank to finished product
|
Old English Pattern Snuff Spoon
One piece construction with bowl drop and tipt handle
The die & block were made from a found bridge bolt and plate of iron or low grade steel. I used a bench grinder and small abrasive wheels to grind and polish the metal. The spoon bowl form has a deeper impression at its head to form the drop or heel, whereas the corresponding spoon die is smooth. Grinding, filing and polishing iron is very time consuming, so this die set is crude (especially the handle tip) and small. The finished spoon is only 4 inches long, a largish snuff spoon or a very small coffee spoon. The "tip" and the "drop" are the feet of a spoon, set one on a table and they are the two points that touch it. These contact points are thickened as buffers to the wear they suffer.
As this was an experiment, I used copper rather than silver. In the 18th century, the spoon blank would have been hammered out from a long narrow sterling billet into approximate spoon shape. To save time, I skipped this and rough cut the blank from 12 gauge copper.
Before placing it in the die, the copper was annealed to soften the metal and make it more malleable. Annealing is a high heat treatment, hence the darkening and discoloration to the copper. Once cooled, the bowl end was placed between the block form and die stamp and the die was struck with a heavy hammer. With the 12 gauge, it took another annealing and a couple of strikes to form the bowl with a fairly refined drop on the reverse. To form the raised "M" shape at the tip, the handle end was placed on the tip form swage of the block and struck once with a heavy planishing hammer.
From this point on it is refining of the forms through grinding and filing. I greatly overcompensated on excess material so had a fair amount of edge grinding to give to the bowl and handle. The drop was given finer definition by hand filing, as were all the edges.
The sides of the stem were purposefully left wider. At this point the stem was made narrower and thicker by hammering it from the sides, this thickening process gives it strength and rigidity (this is why stem hallmarks on British flatware of the mid-eighteenth century are smushed and difficult to read). The handle was also mildly hammered to regain the rigidity it lost in the annealing process. Hammering compresses the metal on a molecular level and makes it harder and springier.
An 18th century piece would have had its hammered texture filed smooth before polishing, I like a hammered finish so let it be and went straight to polishing on a wheel. Glad to live in the 21st century, I cannot imaging polishing with scotch stones, pumice and crocus by hand.
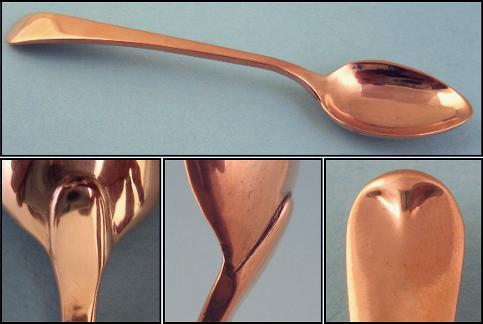
Later, I went back and filed the hammered finish to smooth and repolished. I also took the time to refine the proportions and the crude handle tip.
There you have it, an 18th century style, single piece construction, spoon made with (mostly) 18th century means & techniques.
• • •
|
|
• • •
• • •
Looking to do further research? Have a mark you can't identify? Join the forum.


|